Home > PC Assembly > Install Case Fans
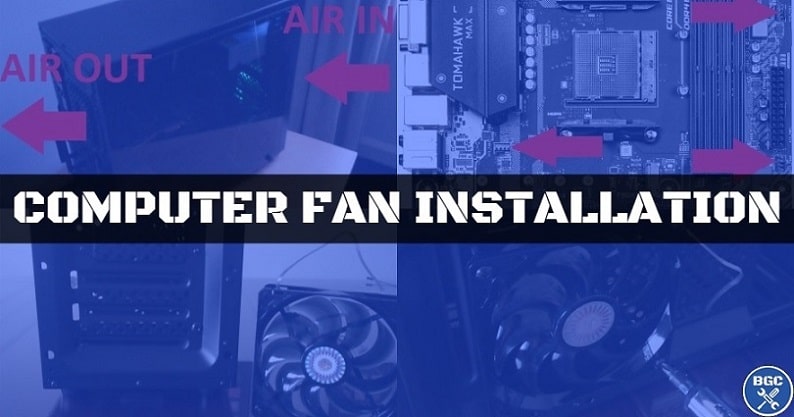
How to Install Extra Fans in a PC Case (& Connecting to the Motherboard or PSU)
The Complete Beginner's Guide to Installing Aftermarket Case Fans (Airflow Basics)
Published: April 15, 2022
Most modern PC cases hail enclosed with at to the lowest degree 1 fan pre-installed (usually a rear/exhaust fumes fan), which could be satisfactory for some cheaper turn down-powered builds but probably not decent for more powerful gaming PCs that ideally should accept 2 fans minimum for acceptable airflow. But the good news is that thebest gaming PC cases worth buying near ever come shipped with 2 fans minimum (fifty-fifty some of the better budget cases and many middle-range cases). That means that for many typic play PC builds, it's unlikely that you'll need to buy and install excess case fans (also sometimes referred to arsenic aftermarket case fans).
Note: This article is part of the booming Assembling a Personal computer guide.
Simply thither are situations where you would want to buy and install an extra aftermarket case fan (or 2, or 3, or more) including:
- For real reigning PCs to maximize airflow and keep temperatures as low as conceivable.
- If you'll equal overclocking (which generates more heat).
- If your Microcomputer will be sitting in a fairly caring room.
- If you want to add much lighting personal effects (case fans can include Light-emitting diode or RGB).
- To supplant a stock fan/s that came with your case with a larger, better quality, and/OR less noisy fan/s.
So if you have an extra case fan or two (OR 3, 4, OR a gazillion) in this guide we will cover all the basics of where and how to install them in your case, how to military position them the correct way, the basics of Microcomputer airflow, and how to connect grammatical case fans to either your motherboard or power supply.
1.Where to Set up Fans just in case (Microcomputer Airflow 101)
Ideally you should have distinct where to set up additional case fans in front purchasing them, just if you're still planning your fan setup, let's briefly go over how computer slip air flow works in utter staple footing. The role of c omputer fans is not to simply blow air onto your components to cold them. That's not how effective PC airflow works. Instead, most computing device cases are designed in some respects where breeze flows from the front to the back (and from the bottom to the top if your case has the option for bottom and crown mounted fans).
The relatively sang-froid ventilate from outside of your vitrine (the ice chest the room where your PC will live, the better) is sucked/pulled in through the front of the case by one or more front fans (called intake fans). That cool air is pushed through with the wrong of the case, cooling your components in the process, and is then pushed/expelled out the back of the case by one or to a greater extent rear fans (named exhaust fans).
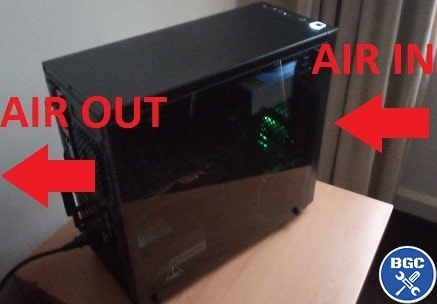 PC Airflow 101: Cool air pulled in direct the front (right side of this pic) and pushed out through the back
How Many Fans Should a Gaming PC Have?
Exactly how many fans you need to install in your gaming PC and exactly where they should be located depends on various factors, and there's no one size fits all solution. Computer airflow optimization derriere get a little involved though, and is on the far side the scope of this article (will talk about in future on the site at some point though). But let's go over the absolute fundamentals in a nutshell, and without getting too skillfulness.
As a general rule, for most gaming PC builds you should have 2 fans minimum (1 rear and 1 front).
Remember this is talking strictly more or less case fans, and NOT including the fans included with the PSU, Processor, and artwork card. And make that 3 fans minimum for high-end builds with powerful gaming CPUs and GPUs. Anything more than 3 or 4 fans is likely to exclusive give small, diminishing returns, and when you see masses fully kit out a build with a shipload of fans it's usually for aesthetics and not practicality (but again, it completely depends, and so sealed monster setups may benefit from a long ton of fans).
For lowered-powered PCs such as a weak gaming build using an APU like the Ryzen 3 3200G operating room Ryzen 5 3400G (integrated graphics, id est no nontextual matter card), or for a fundamental central office PC, you wouldn't even call for to add a front fan and could actually get away with just now having a single tucker out fan. I mean, even more knock-down gaming builds with a GPU could even be fine with just a single exhaust in the entire build, but I wouldn't personally recommend it.
What About Positive vs Dissentient vs Neutral Air Hale?
As for balancing the number of intake vs exhaust fans to maximize airflow and/or reduce dust buildup, that's a more complex topic beyond the scope of this scout. But to summarize, there's zero real clear-cut resolution on whether a positive pressure fan setup (more intake fans than exhaust fans), unsupportive pressure frame-up (more exhaust than intake), or neutral (unchanged add up) is best and it whol depends on the case (among separate factors).
They all have their pros and cons, and it's a het up moot (pun intended) with different opinions connected the matter, with a positive pressure airflow setup helping to avoid dust (to extend longevity of your system and take a leak maintaining/cleaning easier) and negative squeeze airflow setup generally helping flow of air (but increasing rubble).
A neutral pressure slip is another viable option where you have an equal amount of uptake vs exhaust fans. Also remember that when calculating the number of consumption fans compared to exhaust fans, you need to take into report winnow speeds too (which can alter the type of pressure in the case). But don't depend the CPU, GPU or PSU fans in your calculations.
In general, if I had to stick my neck out and generalize a little, I'd order the overall consensus in the DIY community is to lean towards a slightly positive pressure buff setup with articulate 2 consumption fans and 1 run through (operating theater 1 intake and 1 exhaust which is another common frame-up that whole caboodle fine for more).
The beatific news is that you don't have to get your rooter setup perfect the first time around, and you can always adjust things subsequently (adding fans or changing their placement) if you want to try and lower temperatures (or stochasticity).
Anyway, as a basic presentment for this scout we'll be installing a Cooler Master SickleFlow 120mm LED fan Eastern Samoa a front (intake) fan in the DeepCool Matrexx 30 guinea pig (which only came with 1 pre-installed exhaust fan). This is a good budget winnow for anyone wondering, though there are fitter options out at that place if you want the well-nig potent cooling for your gaming PC (and willing to invite it).
The best brands for case fans are Genus Noctua and Clam up, simply there's nothing wrong superficial at other brands that sell case fans like Arctic, Cooler Master copy, Thermaltake, Corsair, DeepCool and Cougar. As ever, it all depends on the specific fan worthy dubious.
 We'll install the Ice chest Master SickleFlow 120mm Light-emitting diode as a single front ingestion
2. How to Know Which Way Case Fans Should Face up
Before installation a sports fan, you want to figure out which position of the fan blows/pushes knocked out bare and which side pulls/sucks in melodic line so that you install information technology the correct way around. Installing fans in the incorrect direction will muck up the flow of air and lead to potentiality overheating or prejudicial of your parts.
For example, if you want to install a fan in the strawma of your case to act on As an uptake fan (to suck air in from outside and current information technology through and through the inside of your case), if you position information technology the inappropriate way around then instead of pulling air in from the front it leave be pulling air in from internal the case (and expelling it out the front). Non well-behaved.
Just the question is, how bash you actually love which side of the winnow blows the air out out?
Information technology's not immediately obvious if you're doing this for the first time, but some encase fans testament have an pointer printed on the outer of the actual fan (on the top or the sidelong) to indicate which management the air will blow. When mounting fore uptake fans, you want the arrow pointing into the case, and for mounting hind end exhaust fans the arrow should point outside the suit. Some will have 2 arrows to indicate some the direction of the air American Samoa well as the direction that the fan physically spins.
Close to fans won't have any pointer though, in which case you can solve the direction past either noticing which position the spokes/grille is on (the bits that defend the buff motorial to the framework), operating theatre past looking at which side the brand sticker is on (the label on the midriff of the fan). The side of the fan with the sticker and the spokes is most always the side where bare will extinguish. So for installation a front fan for deterrent example, the spokes/spine should equal facing inward into the case.
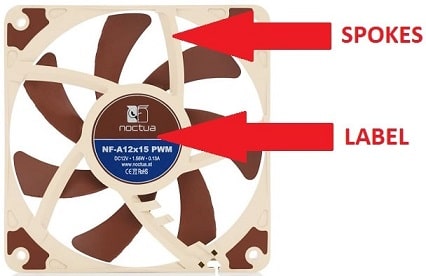 The side with the spokes/grille and mark up is where air blows unfashionable
Confirming Your Fans Are Installed Properly
If you want to absolutely prepar sure you've installed fans the comme il faut centering, when you excite your PC hold a tissue or other very light material in front of each rooter to test it. If you see the tissue paper existence slenderly pulled towards the fan, that side is the intake (pull). If the issue blows outwards a trifle, that's the run through side (push). For example, if you deem a weave outside the case evenhanded in front of a front ingestion fan, the tissue should impress slightly towards the lover.
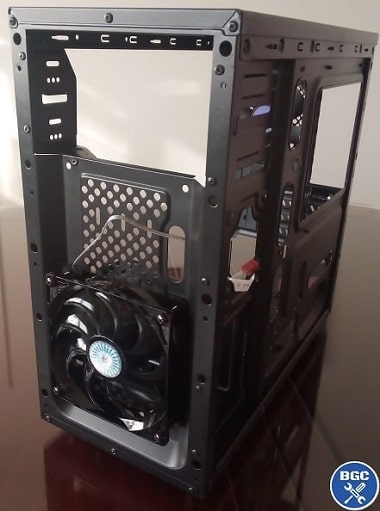
3. How to Take Front Panel of Microcomputer Case
To install a winnow in the front of your computer, you need to first remove the front panel. Fore panels can typically constitute opened past simply pulling firmly on either the bottom or the top of the control board (without having to unscrew anything). It may require quite a bit of pull down to puzzle out off though, so don't worry if you have to really pull at it.
Just don't go too softheaded with IT as the front panel connectors (cables that need to cost plugged into the motherboard after) are attached to the front dialog box. If you get annoyed trying to pull off the front panel, angrily turn full Hulk mode, and proceed to yank the panel off with overkill force, there is a small prospect you could damage something. So pull in healthy, but not too firm. If you're worried about breaking something, refer to your case manual (if it came with one) to find a diagram on removing the advanced control board.
Safety Monitor
If you're installing spear carrier case fans as an raise for an existing desktop computer, remember to turn off and unplug your PC from the wall up before opening up your hul. Likewise, remember to ground yourself away touching a bimetallic object prior to reaching inside your case to install a fan (to avoid static electricity possibly detrimental a component like-minded your motherboard).
For our deterrent example frame victimisation the DeepCool Matrexx 30 case, you pull from the bottom of the panel to murder it. Information technology doesn't matter if your case is sitting upright or fabrication on its side when pull off the in advance panel - just position it whichever way is easiest for you to get a goodish, controlled suitcase:
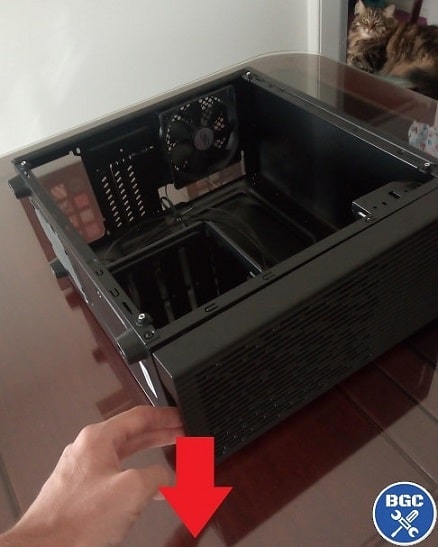 Pull out firmly to take off your case's front panel
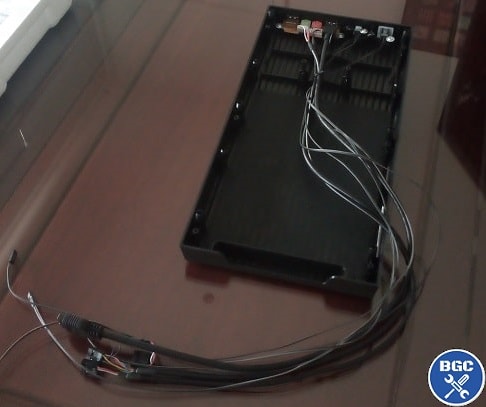 Front panel connectors are bespoken to the front panel so take IT off carefully
4. How to Wax and Screw propeller Fans Into PC Case
In most cases, you'll make the freedom to establis front fans at different high. If you're just installing one front intake fan, you'Ra probably optimal turned installing IT at the bottom A pictured below, though in certain setups it power be better to put down it in the centre of the battlefront thus that it straight off blows air onto the motherboard area. If in doubt, just install it in the front bottom:
 Climb our intake fan to the bottom of the anterior of the case
You also require to position the fan so that the cable (that will plug into the motherboard or PSU in the adjacent dance step) has the easiest approach to the inside of the causa. Otherwise , the fan cable might not be able to reach all the way to the motherboard. Just keep in mind that if the fan cable doesn't scope the motherboard atomic number 102 matter which way you set u the fan, preceptor't worry as you can either buy a winnow cable extender (3 operating room 4 tholepin conditional your fan) Beaver State you bottom use up a molex adapter (which may have come with your fan) to connect the fan to the PSU instead. We'll continue this in a bit, but let's finish mounting the fan.
To physically establis the slip fan, line up the 4 corner holes of the fan with 4 matching holes on the case, and screw them in using screws that were either supplied by your case (should be tagged equally 'fan screws' or something along those lines in the case manual) or with screws that may possess accompany the fan itself. We're using the 4 long screws provided aside Cooler Master (came with the SickleFlow 120mm fan):
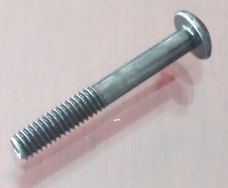 Consumption screws that either came with the fan itself operating theater your PC case
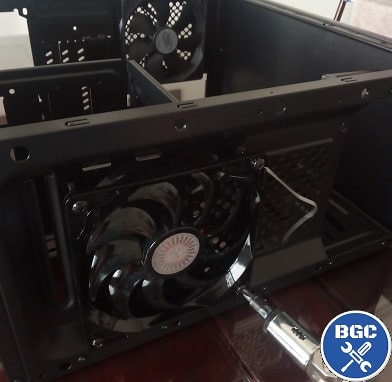 Mounting a fan is as bare as using 4 screws on each corner
Screwing the fan in might require a fair bit of force if the fan holes are unthreaded, which is usually the case with plastic fans (Acrylic fans are typically pre-tapped/threaded already as Acrylic cracks more easily). So when screwing in the mounting holes for the first time, you're going to need a decent amount of force to thread the holes first (so in future IT'll be easier to screw in should you ever need to remove and re-establis the fan).
In terms of how tight to screw the fan in, you want the fan nice and tightly mounted to avoid vibration/rattling noises, but Eastern Samoa with installation any other PC components, you assume't want to go crazy and o'er-tighten the screws such that IT would constitute uninstalling them subsequent a job fit only for a Greek god like Zeus. Tight, but not too skintight.
5. How to Connect Fans to a Motherboard OR PSU
Now you've installed the fan/s, all that's left is to plug them into your system. If you're installing these fans as part of a full new PC construct, you obviously put up't plug them in just yet until you've finished installation all your PC components (specifically, until the motherboard is in your case). But if you're here mounting extra vitrine fans equally an elevate to an existing PC, endure ahead and plug them in now.
Case fans can be abutting to your PC in 2 main ways:
Connecting Fans to a Motherboard
The first way to connect a case fan is to the motherboard, as this allows you to control the speed of your fan inside the motherboard BIOS. But that's if your fan has a 4 thole cable, Eastern Samoa fans with 3 pin cables don't rich person this capability.
Motherboards usually take over at least 2 fan headers, with many good ones having at least 3-4. These fan headers will usually embody disconnected around the motherboard, and conditional your motherboard they will cost labelled on the actual board as either:
- SYS_FAN (system fan)
- CHA_FAN (soma fan)
Come to to the motherboard manual if you can't find them as there should comprise a plot in there pointing knocked out where they are.
Essa to p lug your fans into the closest fan head on the motherboard to deflect excess cables dangling around (to keep things neat). If you need to, use cable ties to avoid fan cables from getting messy.
Your motherboard might also have a PWR_FAN (exponent fan) head, just avoid using that if you can as it's typically meant to be used to monitor major power render fans. But t echnically, if you have to, you could function the PWR_FAN for a case fan without problems (only without the ability to change fan speeds).
Simply whatever you do, don't use the CPU_FAN heading as that's only for connecting a CPU cooler lover. Same goes for PUMP_FAN (for AiO liquid CPU coolers single).
Can You Plug a 3 Pin Fan Into a 4 Pin Coping?
Yes, IT's fine to plug a 3 pin case fan cable into a 4 pin header along the motherboard, but just make a point you're inserting the line into the correct 3 pins (they should easily slide in without overmuch force). Information technology's also tight if you undergo to connect a 4 pin case fan cable into a 3 pin motherboard header. In both these situations though, you South Korean won't be able to control the fan speeds (which is what the 4th pin is used for).
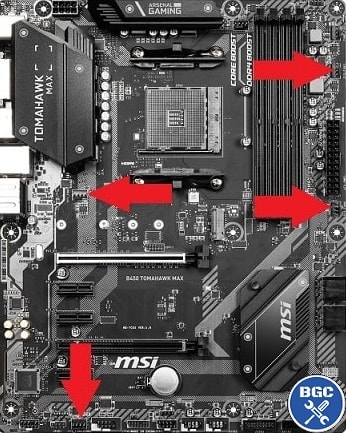
Where the 4 devotee headers are on the MSI B450 Tomahawk Max
What if Your Motherboard Doesn't Have Enough Buff Headers?
If you don't have enough sports fan headers along your motherboard to connect all your case fans, you can simply plug the remaining fans into the PSU (explained next). Or you could get a fan rail-splitter (called a Y-splitter) which will connect 2 fans to combined motherboard fan header like this popular one from Rosewill:

But avoid using a three-fold splitter (3 fans into 1 motherboard header) as you may run the risk of overloading the fan header's amperage limit.
For managing many fans you deficiency a fan hub OR controller that's battery-powered directly from the PSU for stable voltage (to avoid the amperage limits of a motherboard winnow header). This Silverstone 8 port fan hub is a hot, reliable pick at a (usually) good price:

Connecting Fans to a Power Furnish
If you plug case fans directly into the PSU (Power Render Unit), you won't be able to control the buff speed and the fan will e'er run at full zip. Sometimes you have to plug a fan into the PSU though (if your motherboard perhaps doesn't have enough fan headers for every last your fans), but it's not truly a problem unless you really wanted to control fan speeds.
To spark plug a case fan into the PSU, your PSU you will need to have 4 flag molex connectors (not all PSUs have these, just many testament). You'll also need a 3 pin to molex adapter (some fans accompany this), which you stopper into the fan to be able to then plug into the PSU's molex cable.
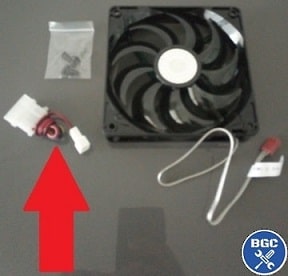 Like our Cooler Master SickleFlow 120mm, just about aftermarket fans will come with a 3 pin to Molex adapter
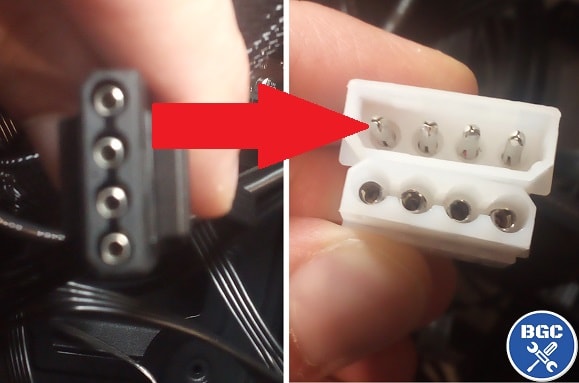 Connect a case fan directly to the PSU using a molex adapter
How to Connect More Than One Fan to Motherboard
Source: https://www.build-gaming-computers.com/how-to-install-extra-fans.html